
- System should require nothing more than a web browser to access. Internet Explorer and FireFox have been successfully tested, but others are not guaranteed to work (Safari has known issues).
- Reagents are generally "1 equivalent" unless otherwise stated.
- Syntheses are generated randomly by the system, thus the solutions and steps suggested by the system may be non-unique and non-ideal.
- When generating reaction products, the system will often omit "inherent products" in the results for the sake of brevity. For example, bromine radical addition should yield HBr as a by product and condensation reactions should yield H2O in the products, but the system does not display these. For "real" examination purposes, you should include all of these to properly balance all reaction equations.
- While practicing with the system, selecting a reagent from a list is simple enough, don't forget that in "real" exams, you will most likely have to write out the complete reagent specifications from memory.
Follow the links below to get a walkthrough of the most basic steps needed to complete common tasks.
Entries with the  icon represent video tutorials.
- Q. I'm lost and do not even know how to get started. What should I do?
- A. Check out the walkthroughs which
include step-by-step instructions on how to get started
with the most common tasks.
- Q. How do I login to the site?
- A. There is no formal login page for the site.
When you generate a synthesis problem from the "Synthesis Explorer"
setup box, just make sure you put in your user ID (student ID number)
next to the "User Class and ID" label and the system
will keep track of your records from there.
- Q. How do I submit a completed problem?
- A. There is no separate answer submission step. If you "logged in"
by putting in your user ID as described above, just work on the
synthesis problems and as soon as you enter the right answer,
the system will automatically congratulate you on your success
and record your progress in the system. You can verify this as
it will state "Your progress was recorded in the system."
- Q. How many attempts do I get to complete a problem? Is there a time limit?
- A. All problems provide an unlimited number of tries,
with no penalty for guessing. Problems do not have time limits
(other than due dates for assignments). The system does not
ever record anything you do "wrong," it only records when you
get a problem correct. So feel free to click around and experiment
with different things. You will never be penalized and this can
be a great way to really learn and master the material.
- Q. How do I work the synthesis problems?
- A. Check out the walkthroughs which
include step-by-step instructions on how to get started.
- Q. How do I check how many problems I've already completed?
- A. Check out the walkthroughs which
include step-by-step instructions on how to get started.
Most students will just be interested in the "Progress Checklist" to see how to complete their class requirements, but detailed "Problem Records" are also available under the User Records section.
- Q. When I work on "random" synthesis problems, what chapter should I work on?
- A. This is largely up to you. You have the freedom and flexibility to
select any chapters you feel you need to review the most. Note that you can
even select multiple chapters to generate more challenging (and realistic) problems.
Beware that, depending on your class, you may have additional requirements to complete at least X problems from each relevant chapter. In that case, you should try to cover the chapters listed on your Progress Checklist page.
Fulfilling these chapter requirements is easier than you probably think:- Completing assigned (non-random) problems counts towards completing the chapter requirements.
- You can select multiple chapters when generating a random problem (Ctrl+Click to select multiple), and then completing just one such problem will count towards all included chapters.
- Technically you could generate and solve just 2 problems that include every chapter and that will already fulfill the chapter requirements.
- Q. I've been working on one of the assigned "non-random" problems forever and still cannot figure it out. Can I get some help?
- A. Some notes and tips on non-random problems:
- Don't feel bad if you're having trouble with the assigned problems, they are specifically designed to be challenging.
- Unlike "random" problems, the assigned "non-random" problems do not allow you to see the solution until you have solved them, but you do still get to see the starting material "hint" and have unlimited tries with no penalty for guessing.
- Check the Reaction Drills for the respective chapters or the Examples links for the reagents if you need to review the major types of reactions.
- Go back to doing random problems from the same chapters to get more practice with the material until you can figure it out.
- Hint: Note that when you select a non-random problem, it includes a description like [Smith 11.12...]. This refers to the last chapter section that you need to know to solve the problem and if you read that particular section, it's probably a big hint towards how to solve the problem.
- For most classes, you can still get partial credit for the work you do even if you're unable to solve every assigned non-random problem.
- If you are still struggling, try working with your classmates or instructors to figure out the solutions. No computer system is ever going to replace having a good colleague to discuss with.
- Q. One of the synthesis frames (reactant or reagent) will not load, preventing me from working on the problems. What can I do?
- A. Several students have reported this issue, however I have been unable to
reproduce it to debug it.
If you can at least get the Product and Pathway frames loaded, there are a couple links at the bottom of the Product frame which allow you to selectively reload the Reactants and Reagents frames.
Another alternative is to click on the "Select a Reactant" or "Select a Reagent" boxes from the Pathway frame to spawn popup windows from which you can select the reactants and reagents. In this manner, you never need to use the Reactant or Reagent frames at all.
- Q. My web browser "freezes" when I try to work on a problem. What can I do?
- A. I have not been able to consistently reproduce such issues, but here are
some possible ideas.
- One known cause of "freezing" is some kind of defect in the Skype instant messenger, Internet Explorer add-in. Read the following web page for more details on how to get rid of it: http://share.skype.com/sites/devzone/2007/06/the_skype_addin_for_internet_e.html
- Your best bet may be to just try it from a different computer. I tried several computers in the science library and they all work.
- Make sure all other windows and applications are closed and not interfering with the site.
- Maybe avoid the [Mechanism] and "magnify" functions as I noticed FireFox has trouble loading the Java applet the first time. Once it successfully loads once (even if it's in Internet Explorer) it does seem to work thereafter. You should still be able to complete all synthesis problems without using any of these pages.
- Check the FAQ about frames not loading which has some tips which may be related to what's happening.
- Q. The system shows the reactant, reagent and product for all reactions, so what am I actually supposed to do?
- A. First, make sure you are not in the "Reaction Drills" section.
Those are only for your review and are not graded.
If you are in the actual "Synthesis Explorer" interface,
the system does predict the products for you, but your job
is to come up with the right sequence and combination of reactants
and reagents to arrive at the "Target Product" in the top-right frame.
- Q. I tried every reactant and reagent combination and none of them produced the target product. What's wrong?
- A. These are supposed to be *multi-step* synthesis problems,
so it's very likely that the problem cannot be solved by
any single reactant-reagent combination.
To complete a multi-step synthesis problem,
after you complete one reaction, you need to click on
the *product* of the reaction to copy it as a *reactant*
for a subsequent step.
The synthesis problem walkthrough illustrates an example of this.
- Q. I am an instructor from another institution and am interested in using the system in my class. How can I go about this?
- A. Your students can already freely access the system to work on problems.
If they "login" with a unique identifier (e.g., student ID number), the system
will also track the problem completion records. As the instructor, you may then
review these records from the Problem Records page
which includes additional instructions.
For more advanced instructor features, such as assigning specific (vs. random) problems with enforced due dates, instructors should contact the developers to arrange an appropriate collaboration to configure the system accordingly.
Illustrated below are system screenshots with annotated descriptions of the purpose and function of different buttons and controls.
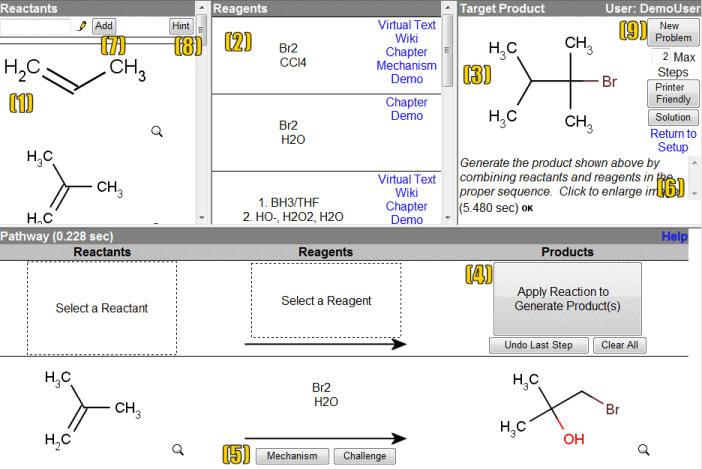
- Available Reactants: The starting materials available to you when trying to synthesize the target product. Click on one to copy it down to the synthesis pathway workspace area.
- Available Reagents: The chemical reagents available to react with the reactants to synthesize the target product. Click on one to copy it down to the synthesis pathway workspace area. Note the text links to the right of each reagent which will bring up additional information on how to use the reagent.
- Target Product: The structure of the chemical product you must synthesize to successfully complete the problem. Do this by correctly combining available reactants and reagents in the correct combination and sequence. Cautionary messages may appear below the product if the system generated synthesis plan includes steps which yield multiple products or stereoisomers.
- Reactor / Product Generation: After copying appropriate reactants and reagents to the synthesis pathway workspace area, click this to apply the reaction model and have the system predict what products will be generated from that combination. If the result matches the target product, you have completed the problem.
- Previous Products & Reactions : Reactions you have composed from previous steps, including their predicted products are displayed below. Click on one of these previous products to copy it as a reactant for the latest reaction step to continue a multi-step synthesis.
- Context Sensitive Help: Help messages will appear here briefly describing whatever button / control you "rollover" with your cursor.
- Add Reactants: Controls to sketch (pencil) and add your own reactant structures to try novel reactant-reagent combinations.
- Starting Materials Hint: Provides a hint by bringing all of the starting materials used in the system's solution for the synthesis near the top of the available reactants list. As an added challenge, distractor molecules that are similar to the "real" starting materials will be mixed in, requiring you to select for the correct ones.
- Control Buttons
New Problem: After completing or giving up on the current target product, click this to generate a new target product using the same setup parameters (i.e., categories / chapters).
Max Steps: When generating a new problem, it will have a solution with no more than the number of steps indicated.
Printer Friendly: Display the current synthesis problem in printer friendly format in case you prefer to print out and work on the problems offline.
Solution: Display a possible solution for the synthesis of the target product, the one generated by the system.
Return to Setup: Return to the system setup / home page.
Illustrated below are system screenshots with annotated descriptions of the purpose and function of different buttons and controls.
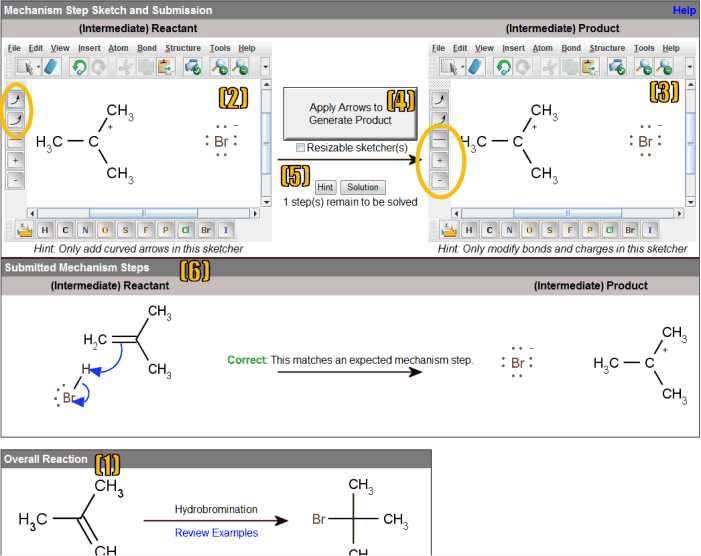
- Overall Reaction: The net / overall reaction for which you are to determine the curved arrow mechanism diagram for.
- Mechanism Arrow Sketcher:
Where you sketch your proposed curved arrow mechanism diagrams.
The sketcher should be pre-loaded with the
reactant side of the next mechanism step to be completed.
Refer to the Mechanism Sketching Tips
for more info on how to use the sketcher. In general, the only functions
you should need in this sketcher are the curved arrow buttons on the left (circled).
This requires a Java applet, signed by ChemAxon, so make sure you have Java enabled in your browser and you accept the applet. If you do not wish to use it, you can still view the expected mechanism with the Solution button. - Mechanism Product: Represents the expected product of electrons following the arrows from the mechanism arrow diagram on the left. If presented as a sketcher, that means you must modify the sketcher contents yourself to represent the expected product structure. In general, the only functions you should need in this sketcher are the bond drawing tool and the formal charge modifiers (circled).
- Product Generator / Mechanism Calculator: Once you have completed a mechanism step diagram with curved arrows, click here to have the system actually "apply" the arrows to the molecule, changing the configuration of bonds and electrons, to generate the expected product of the diagram.
- Support Buttons:
Resizable Sketcher(s): If your diagram is getting to large to fit in the sketchers, click this checkbox to make popup, resizable sketchers available.
Hint: Click to load the next expected step's structures into the sketcher(s). From there, just complete the step with curved arrows representing the electron flows between the reactant and product sides.
Solution: Display the system's expected mechanism steps. - Submitted Mechanism Steps: Shows all of the mechanism steps that you have submitted, along with any notes on correctness.
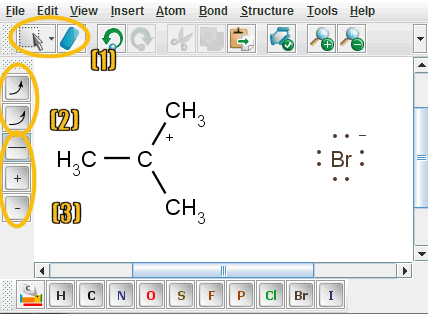
- Component Select and Erase: Use the select tool to click-and-drag pieces of the diagram around. This can help arrange the diagram pieces to facilitate arrow drawing. The eraser can be used to remove unnecessary pieces.
- Electron Flow Arrows: Two different types of curved arrows can be used to sketch electron flows. The first is a typical arrow for moving 2 electrons at a time, while the second is a "fishhook" arrow for moving 1 electron at a time (i.e., radical reactions). Alternatively, you may access the arrow functions from the Insert > Electron Flow command menu.
- Bond and Charge Modifiers:
The product structure sketcher will generally be pre-loaded with the reactant
structure for the next mechanism step. To convert it into the expected product
structure, you will generally only need to use the bond tool to
create new bonds or modify bond orders, as well as the formal charge modifiers.
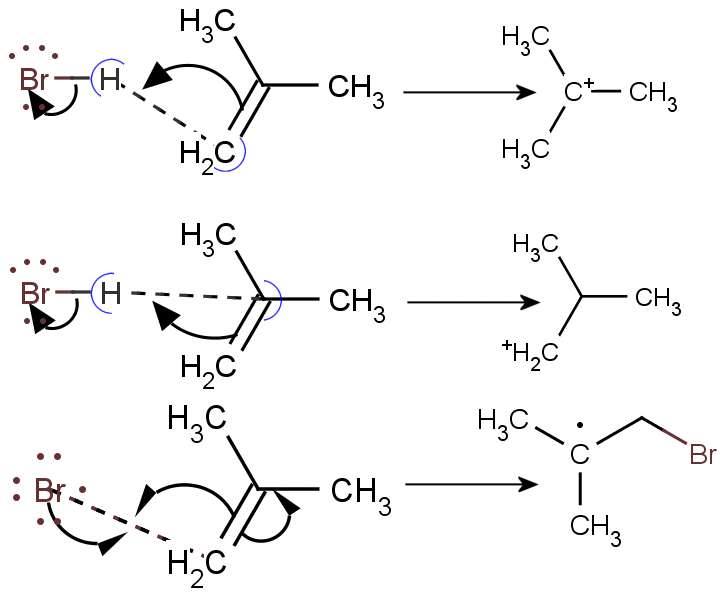
Arrow Drawing Tips: Once you select an arrow type, just click on the source of an arrow such as a bond or atom (i.e., lone pair or free radical), and then on the target / sink for the arrow, usually an atom or the space between two atoms where a new bond will form. In the last case, a dashed line should appear in the place where this incipient bond would form to help you precisely specify your diagram target.
Bonds as Electron Sources: When the source of an electron flow is a bond, special care must be taken when selecting the target / sink for the flow. Information on the "polarity" of the bond, in particular, which atom of the source bond the electrons will remain attached to, must be specified. This is specified by having the target of the electron flow be slightly between a target atom and at least one of the source atoms. See the first two examples below for what may appear to be the same mechanism step, but which differs in the result based on how the polarity of the source bond is specified, as indicated by the blue half-circles around the target atoms, and the dashed line representing an incipient "forming" bond.
Free Radical Mechanisms: The last example below illustrates a free radical mechanism step. These commonly involve 3 "fishhook" arrows and often involve 2 such arrows meeting halfway between two atoms, again indicated by the dashed line for a forming bond.
Illustrated below are system screenshots with annotated descriptions of the purpose and function of different buttons and controls.
Each row represents a distinct single step reaction with a component missing, left for you to fill-in-the-blank. This is a good way to quickly quiz yourself to learn and review basic reactivity. This is intended as a self-test exercise, so no progress report is recorded in the system for these. Instead, you should just try visualizing or writing down the answer to each problem on paper before revealing the answers.
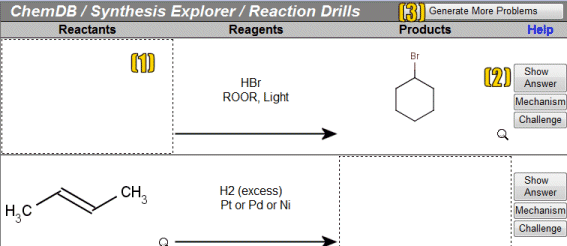
- Missing Component: Reactant, reagent or product of the single step reaction that is missing, left for you to fill-in-the-blank.
- Control Buttons
Show Answer: Once you've made a guess for missing component, click on "Show Answer" to reveal the answer the system generated.
Mechanism: Click to load up the reaction in the Mechanism Explorer to practice writing or directly view the arrow-pushing mechanism for the reaction.
Challenge: Click if you feel the predicted product for the reaction is in error. This will bring up a form where you can submit what you believe the correct behavior should be for subsequent review.
Magnifying Glass: Most molecules depicted throughout the system will include a magnifying glass link icon nearby which will load up the molecule in the Molecule View page for additional details on the molecule, such as stereochemistry, rotatable 3D structures and standard IUPAC names. - Generate More Problems: After completing a page worth a problems, click "Generate More Problems" to refresh the page with a new set of problems using the same category / chapter filter criteria.
Illustrated below are system screenshots with annotated descriptions of the purpose and function of different buttons and controls.
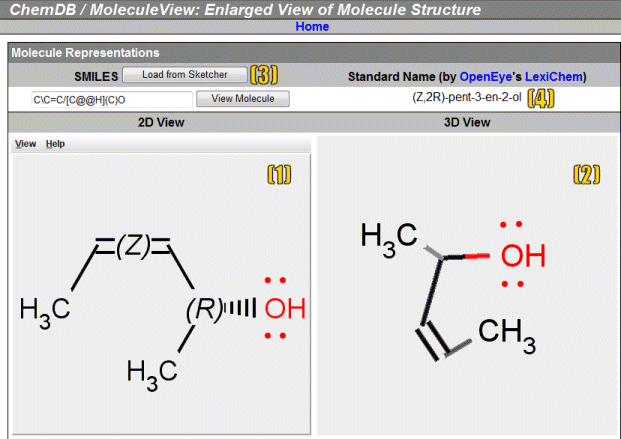
- 2D View and Sketcher: 2D view of the molecule, including absolute labels for all stereocenters. Click on the viewer applet to bring up a sketcher window to manipulate and modify the molecule.
- 3D View (Rotatable): 3D view of the molecule which can be rotated by clicking and dragging the viewer. Right-click the viewer for additional options, such as adding explicit hydrogens.
- New Molecule Input: After sketching a new molecule in the 2D viewer / sketcher, click on [Load from Sketcher] then [View Molecule] to reload the page based on that molecule, which will update the 3D viewer and other fields accordingly.
- Standard Name: Systematic name (usually IUPAC or common name standard) for the molecule. If the name includes the phrase "BLAH" it means the system was unable to fully determine the proper name for the molecule.
Illustrated below are system screenshots with annotated descriptions of the purpose and function of different buttons and controls.
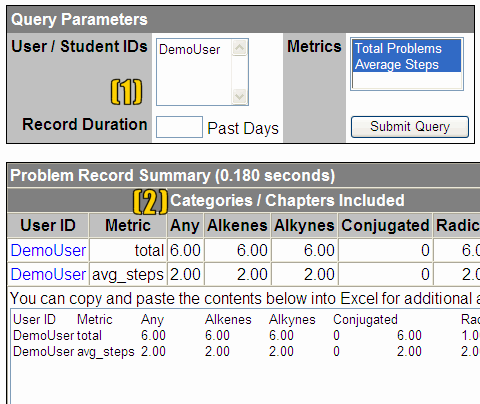
- Query Parameters: Use this to select which parts of your problem record to review. Usually just put in your student ID number and that will do.
- Problem Record Summary: Summarizes your past record of problems completed. Note that only multi-step synthesis problems successfully solved are recorded. The most relevant statistics include the total number of problems you have completed, listed under the "Any" column and the "total" row. Click on your your user ID link to view the detailed records.